Saturday, July 27, 2013

Saturday Morning Videos: Lollipop Cover


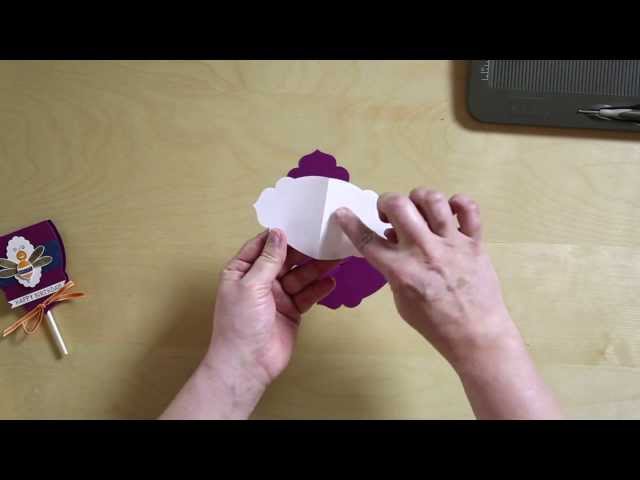
Good morning and welcome to Saturday Morning Cartoons Videos!  Today I have for you a quick demonstration of how to make this darling candy cover. These would make fantastic party favors or little treats to give away! You can customize them with any color or stamp set so they could fit any theme or occasion and they are really quick and simple to make!

Start by cutting the larger frame shape from the Apothecary Accents Framelit dies and don't forget to use the Magnetic Platform to hold the framelit in place and make it super easy to use! You will need two of the labels. 

You will also need to cut an extra shape out using a plain scrap paper , this is to use as a pattern and will help make sure you get your score and cut lines straight. Fold it in half and then you have a straight line to work with. 

Use the Simply Scored Scoring Tool to score. Measure your candy to determine how long to cut your label. For this project you will need it to be 3-1/4" long, so we have the marker set there, then score. Then, come over another ¼ inch and score again. This second score line is actually your cut line. Use your Stampin' Trimmer or Paper Snips to trim off this edge. Do this with both labels, over lap and adhere with Sticky Strip.

Use any household paper punch to punch holes in the bottom, and thread ribbon through and tie your candy inside. We used orange 1/8" Taffeta Ribbon it's the perfect size for this! Embellish this any way you'd like. We used the Bug Me stamp set and the Remembering Your Birthday set for the greeting. 

Take a look at the instructions in action!


Click on the Pic . . .
(Email readers go to my BLOG to see this!)

Use this fun idea for your next party or treat giving occasion!  And thanks for watching cartoons videos with me today!  If you're in the mood for cartoon video reruns, check out my Videos page!

~Hugs~   Cheryl O.    J

Saturday, July 20, 2013

Saturday Morning Videos: Paper Pumpkin Kits

Good morning and welcome to Saturday Morning Cartoons Videos!  Did you know you can get Stampin' Up! stamping kits delivered right to your door every month?  This little box of goodness is called 'Paper Pumpkin' - take a look!


Click on the Pic . . .
(Email readers go to my BLOG to see this!)

How fun and convenient is that?!  If you'd like to know more about Paper Pumpkin, contact me today or go to http://mypaperpumpkin.com.  And thanks for watching cartoons videos with me today!  If you're in the mood for cartoon video reruns, check out my Videos page!

~Hugs~   Cheryl O.    J

Saturday, July 13, 2013

Saturday Morning Videos: Kissing Technique

Good morning and welcome to Saturday Morning Cartoons Videos!  Have you ever heard of the kissing technique?

We're not talking about the technique with your sweetie—we're talking about the one with stamps! Check out this sample featured in this video, see how the butterflies have an extra texture? It's the beautiful product of two stamps getting together! 


Click on the Pic . . .

Thumbnail


(Email readers go to my BLOG to see this!)


And in the other sample, see how the hearts have the crisscross design? It's so easy, here's how you do it: (We're using clear mount because it's a little easier to see.) You will need one bold image and one patterned image. Ink up the bold image and then "kiss" the un-inked patterned stamp to the bold ink image. The un-inked stamp will pick up some of the color leaving you with a delightful texture.


I hope you give (stamp) kissing a try!  And thanks for watching cartoons videos with me today!  If you're in the mood for cartoon video reruns, check out my Videos page!

~Hugs~   Cheryl O.    J

Friday, July 12, 2013

Everything is . . . stampin' BUSY!

Hello, everyone!  Wow, I've had a busy week!  Getting back into the real world after 2 weeks at a northern MN lake can really take a toll on a person.  Besides working my full time job as a college receptionist and visit coordinator, I finished up wedding invitations for a client and have been working like a crazy woman in preparation for the Mayer Rising Community Festival Craft Fair tomorrow, Saturday.  I think I will breath easier by Sunday.  

Anyway, I wanted you to know that I have NOT fallen off the planet . . . and I even have a card to share with you! It's made by one of my fellow DOstamperSTARS and features one of my brand new stamp sets (to me, anyway!) called Everything Eleanor.


Isn't it pretty?  I need to make some time to pull out my Everything Eleanor set and play with it!  Maybe after this weekend's craft fair . . .


All supplies are Stampin' Up! unless otherwise noted

Card Recipe
Stamps:  Everything Eleanor, Petite Pairs
Ink:  Always Artichoke, Marina Mist
Paper:  Always Artichoke, Whisper White, Regals DSP Stack
Extras:  Scallop Trim Border punch
Inspired by: my fellow DOstamper STAR - if you know which one, please leave me a comment!

Purchase the Stampin’ Up! Supplies to make this project at my ONLINE STORE.

Everything Eleanor Clear-Mount Stamp Set
Petite Pairs - Clear-Mount Stamp
I hope you have a great weekend - and if you're in my corner of MN, please stop by the Fair to say 'hi'!
Thanks for stopping by today!


~Hugs~   Cheryl O.    J


Monday, July 8, 2013

Mayer Rising Community Festival: Craft & Vendor Show!!


Join me this coming weekend for this year's
Mayer Rising Community Festival Craft & Vendor Show
July 13, 2013  ~  9:00 a.m. - 2:00 p.m.  ~  Mayer Community Center  ~  Mayer, MN  55360
Lots of hand made crafts - including those by CLOcards! 
Come see me at this fun annual festival ~ stop by say 'hi'!
For updates, visit my Facebook event page.
I would love to see you there!


Thanks for stopping by CLOcards blog today!

~Hugs~   Cheryl O.    J

Saturday, July 6, 2013

Saturday Morning Videos: Making a Gift Bag

Good morning and welcome to Saturday Morning Cartoons Videos!  Last week I showed you a video of a gift box topper.  This week I have a video showing how to make a gift bag!  Check it out . . .

Click on the Pic . . .
Thumbnail
(Email readers go to my BLOG to see this!)


This is one of the projects featured in our 2013-2014 annual Stampin' Up! catalog. You will find this cute bag on page 88, and with the use of our trusty Simply Scored scoring tool you can make a bag just like this with little effort. 

If you plan on stamping on your bag, you'll want to do that before you put the bag together. Start with a 6 ½ inch by 11 ½ inch piece of card stock. Score it at ½ inch, 4 ½ inches, 6 inches, and then at 10 inches.
Then turn the paper and score at 1 inch and 5 inches. The next step is to cut off the two small tabs on one side -- and then to cut small Vs along all the score lines around the edges of your paper. (The height of the bag can easily be adjusted to suit your packaging needs.)

Finally, add some Sticky Strip which will secure your bag together. The extra flaps on the top will help secure your handles. This bag has been embellished with the Mixed Bunch stamp set and the Six-Sided Sampler stamp set -- and a highlight is the flower piece created with the Blossom Punch and topped with a Vintage Faceted Button.

For more great ideas, contact me, Cheryl Owczarek, your Stampin' Up! demonstrator ~ or visit http://www.stampinup.com/home/.


Thanks for watching cartoons videos with me today!  If you're in the mood for more cartoon video reruns, check out my Videos page!

~Hugs~   Cheryl O.    J

Wednesday, July 3, 2013

Serving our Country? You are Absolutely Fabulous!


Happy 4th of July tomorrow!  To all of you who serve our United States of America so faithfully, here's a THANK YOU card for you - you ARE absolutely fabulous!


I followed a Mojo Monday sketch for this card and love how it turned out!  The 'stitches' are just paper pierced holes with fine marker lines connecting them.  For the flower, I layered 2 scallop circles and cut between the petals.


All supplies are Stampin' Up! unless otherwise noted

Card Recipe
Stamps:  Absolutely Fabulous, Itty Bitty Backgrounds (both retired)
Ink:  Early Espresso, Crumb Cake
Paper:  Cherry Cobbler, Crumb Cake, Early Espresso, Soft Suede, Crumb Cake DSP (retired)
Extras:  Cherry Cobbler Seam Binding, Large Scallop Edgelits die, 1-3/4" Scallop Circle punch
Inspired by:  MojoMonday sketches

Purchase the Stampin’ Up! Supplies to make this project at my ONLINE STORE.
Large Scallop Edgelits Die
1-3/4 Inch Scallop Circle Punch
Be sure to celebrate safely and gratefully!  And thanks again, service-men and women!!!  May God bless you abundantly - and may He continue to bless our country!


Thanks for stopping by today!

~Hugs~   Cheryl O.    J

Monday, July 1, 2013

You Are Simply Wonderful!

Hello, stampers!  Hope the day is treating you well.  I want you to know I appreciate you SO much - it is good to know I can bring some beauty and inspiration into your day, even in a little way.  And here is a little card just for YOU because you ARE simply wonderful!


All supplies are Stampin' Up! unless otherwise noted

Card Recipe
Stamps:  Brides & Babies, Friendly Phrases (both retired)
Ink:  Basic Black, markers in So Saffron, Elegant Eggplant, Garden Green, Pretty in Pink (retired).
Paper:  Elegant Eggplant, Garden Green, Pale Plum (retired), Whisper White
Extras:  Scallop Trim border punch, Perfect Polka Dots TIEF, blender pen, white organdy ribbon, glitter gel pen.
Inspired by:  my son's wedding colors!

Purchase the Stampin’ Up! Supplies to make this project at my ONLINE STORE.


Thanks for stopping by today!

~Hugs~   Cheryl O.    J